
This situation has probably happened to you… You pulled code from the repository, made a change, saved the file, and when you looked at the diff, you were horrified to see how the whole file lit up green when you only changed one line. You can find yourself in the same situation when you did a code review for another developer, who ignored such a wild diff and pushed the change.
An easy way to keep your code clean and readable is to ensure that many of your project’s coding principles are followed. I do this with my projects, by setting up the Husky pre-commit hook with ESLint, Prettier, and Lint-staged in the Next.js app.
Tools of the Trade
To create such a useful environment, we'll use these packages to check our code through git hooks:- Husky: Supercharges our develop experience by linting, testing, or formatting code as code is committed with git.
- ESLint: Checks for certain code patterns to stop errors or potential bugs.
- Lint-Staged: Lints code before a commit occurs to keep production code clean.
- Prettier: Keeps code formatting consistent based on our own preferences.
ESLint is already set up
Since Next.js version 11, it comes with ESLint integration out-of-the-box. This means that Next.js installs devDependencies like eslint and eslint-config-next and creates an eslintrc.json file. Next.js uses the next lint command to catch ESLint errors.You can check if in package.json already has it.Setting up Prettier
ESLint rules in Next.js already comes with some code formatting rules. To override them and initiate your personal prettier config, start by installing the following devDependencies:
To do Prettier work with ESLint, add "prettier" to the extends and plugins arrays in the .eslintrc.json file.In the extends array, make sure prettier is the last item so that when you define your Prettier configuration, that takes precedence over other configurations that may have their own way of formatting code.
You can also define the rules in this file. For example, whenever there is a code formatting issue with any of the files in my Next.js app, I like it to be exposed as a warning rather than an error.
Create a new file .prettierrc and add a custom Prettier configuration:Also, add a .prettierignore file to ignore formatting on certain directories and files:Installing Husky
To set it up, initially, install the package as a dev dependency:
Monorepo
In my project, I setup monorepo with the frontend and backend as subdirectories and only want Husky run at the frontend directory.So package.json file and .git directory are not at the same level. For example, root/.git and root/frontend/package.json.By design, husky install must be run in the same directory as .git, but you can change the directory during the prepare script and pass a subdirectory:Then install Husky - Git hook with:
In your hooks, you'll also need to change the directory:
That's all for now. Next, we will come back to configure Husky's pre-commit hook after setting up lint-staged.
Setting up Lint Staged
The lint-staged package allows linting staged git files. It also checks for changed files instead of the whole source code.Create a .lintstagedrc.js file at the root of the Next.js app and add the following snippet:After setting up the lint-staged configuration, open the /.husky/pre-commit file and add the following pre-commit hook:Testing Our Setup
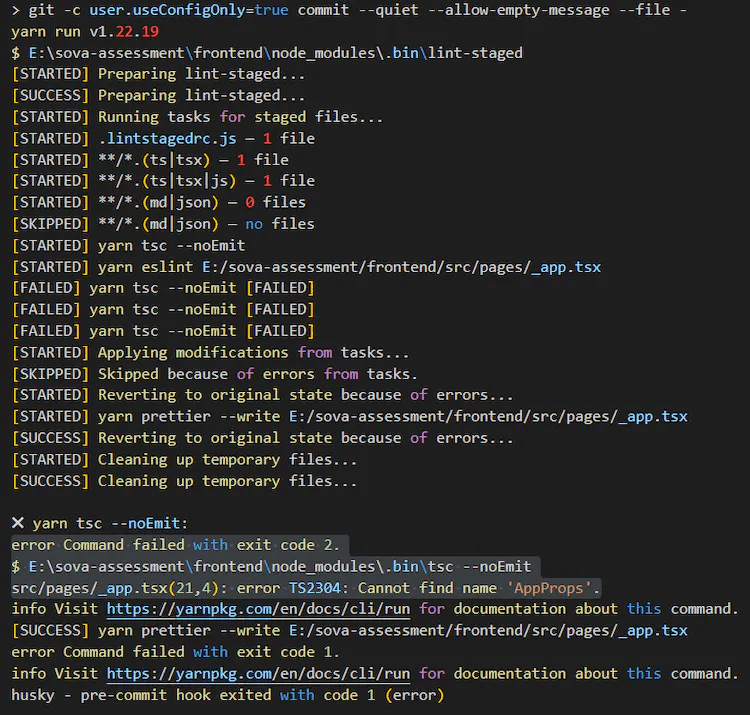
Now that we've installed and configured our tools, let's test this out in action!I have modified the /pages/_app.tsx file and removed the reference to AppProps. This will return a type error when committing this file: